Apache-status, hvad er det og hvordan virker det?

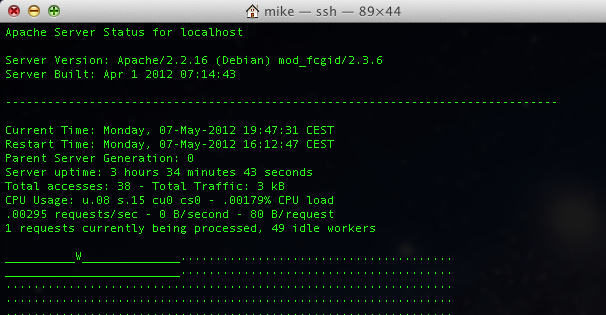
Apachestatus er et sødt lille værktøj der kan vise dig, realtime, hvad der sker i maven på din Apache, det er det mest detaljerede værktøj primært fordi det ligger som en del af Apache og kan derfor vise hvilke tråde der laver hvad, det er meget rart når man fejlfinder spidsbelastede servere.

Værktøjet virker faktisk out of the box på nyinstallerede Debian maskiner, typisk går det dog ret hurtigt til i andre konfigurationer primært fordi det konflikter med både VirtualHosts og mod_rewrite, hvilket nok bruges på 80% af alle installationer i verden.

For at omgå virtualhosts, skal du tage din default-virtualhosts (den som vises når du indtaster din servers ip i browseren) og indsætte flg. stump kode: (udskift v.z.y.x med din egen ip adresse)

<Location /server-status>
     SetHandler server-status
     Order deny,allow
     Allow from 127.0.0.1 ::1 v.x.y.z
 #    Allow from 192.0.2.0/24
 </Location>
Resultatet kan se ud som flg:
<VirtualHost *:80>
        ServerAdmin webmaster@localhost
        ServerName lab1.dk
        ServerAlias *.lab1.mikjaer.com
        DocumentRoot /var/www
 
        <Directory />
                Options FollowSymLinks
                AllowOverride None
        </Directory>
        <Directory /var/www/>
                Options Indexes FollowSymLinks MultiViews
                AllowOverride All
                Order allow,deny
                allow from all
        </Directory>
 
        <Location /server-status>
                SetHandler server-status
                Order deny,allow
                Allow fro 127.0.0.1 ::1 v.x.y.z
        </Location>
 
</VirtualHost>

Genstart apache:

root@lab1:~# /etc/init.d/apache2 reload
Reloading web server config: apache2.

Og tjek http://lab1.mikjaer.com/server-status i en browser, hvis ikke du får noget resultat skyldtes det sikkert mod_rewrite, f.eks. er WordPress kendt for at hijacke /server-status, det kan fixes ved at tilføje flg. linie 5, i WordPress’ .htaccess fil.

<IfModule mod_rewrite.c>
RewriteEngine On
RewriteBase /
RewriteRule ^index\.php$ - [L]
RewriteCond %{REQUEST_URI} !=/server-status
RewriteCond %{REQUEST_FILENAME} !-f
RewriteCond %{REQUEST_FILENAME} !-d
RewriteRule . /index.php [L]
</IfModule>

Hvis du løbende ønsker at blive opdateret på Apache-status kan du åbne flg. url i din browser: http://lab1.mikjaer.com/server-status?refresh=1 så vil den automatisk reloade hvert sekund, alternativt kan du også køre flg. kommando:

root@lab1:~# watch -n 1 apachectl status
Hvilket har samme effekt, blot i en consol.

Happy tuning ?

Udgivet i Apache, Knowledge Base, Old Base | Skriv en kommentar

Linux IPTables double NAT, SNAT / DNAT, portforwarding without default gateway

#!/bin/bash

# eth1 – inet – 195.184.117.131

# We asume that eth0 is on a private RFC1918 lan on which we are connected to as an ordinary client.
# we also asume that eth1 is connected to the internet with a public routable ip adress.
# This script will then setup, so called, double nat (proxying) to allow people on the internet to access
# systems on the inside by connection to eth1_ip and get forwardet to target_ip on the inside
# according to portnumbers as specified in the ports array down below.

eth0_ip=`ifconfig eth0 | head -n2 | tail -n1 | cut -d : -f 2 | cut -d \ -f 1`
eth1_ip=`ifconfig eth1 | head -n2 | tail -n1 | cut -d : -f 2 | cut -d \ -f 1`

# This is the ip on the inside that all requests will be directed to (sorry the scripts does not currently
# allow for multiple inside ip’s … if you need this you need to uncomment the “iptables -t nat -F line
# and run mutilple copies of the script)

target_ip=192.168.0.101

# Port 8080 on the public side will be forwardet to 80 on the internal side
ports=( 8080:80 20:20 30:30 )

# This should be removed if you want this to work with other rules / an existing script
iptables -t nat -F

# This loops through the ports array
for port in ${ports[@]}
do
# This splits the ports array

public_port=`echo $port | cut -d : -f 1`
private_port=`echo $port | cut -d : -f 2`

# … and apply the rules

iptables -t nat -A PREROUTING -i eth1 -p tcp -d $eth1_ip –dport $public_port -j DNAT –to-destination $target_ip:$private_port
iptables -t nat -A POSTROUTING -o eth0 -j SNAT –to-source $eth0_ip

done

Udgivet i Knowledge Base, Linux, Networking, Old Base | Skriv en kommentar

Forbered lyd for afspilning i Asterisk

1: Lav lyden i Garageband, mix den ned og eksporter den som Mp3
2: Åben filen i Audacity
3: Skær det ene spor væk og gem det andet som en wav fil
4: Upload wav filen til serverens rodbibliotek
5: Log ind på serveren
6: cd til /usr/share/asterisk/sounds
7: kør kommandoen : sox /skjultnummer.wav -r 8000 -c 1 -s -w skjultnummer.wav

Herefter kan du afspille lyden med flg. kommando i en dialplan:

exten => 1000,50,Playback(“skjultnummer”);

Udgivet i Knowledge Base, Old Base | Skriv en kommentar

MySQL udtræk med automatiske linienumre

mysql> select lecture,title,@i:=@i+1 as iterator from opgaver,(select @i:=0) foo where lecture=11 order by `order`;
+---------+---------------------+----------+
| lecture | title               | iterator |
+---------+---------------------+----------+
|      11 | Gruppens opst?en    |        1 | 
|      11 | Favoritemne         |        2 | 
|      11 | Indspilningsstudier |        3 | 
|      11 | Antal medlemmer     |        4 | 
+---------+---------------------+----------+
4 rows in set (0.02 sec)


Udgivet i Knowledge Base, Old Base | Skriv en kommentar

check if all wordpress installations is updated

This will probably not work, if a non-wordpress webdir contains a directory named ‘wp-includes’.
Those webdevelopers were probably smoking pot anyway 🙂

web01:~# find /var/www/virtual -type d -name wp-includes | xargs -n1 -I{} -i bash -c ‘echo {} | cut -d/ -f5- && grep \$wp_version {}/version.php && echo’ | less

Udgivet i Knowledge Base, Linux, Old Base, Wordpress | Skriv en kommentar

ispcp disable mail for a domain

nano /etc/postfix/ispcp/domains
comment domain
cp /etc/postfix/ispcp/domains /etc/ispcp/postfix/working
cd /etc/postfix/ispcp
postmap domains

!!!!!
New and improved version
***

It works with the gui:

– switch to the user (dom.tld)
– delete all mail accounts
– switch back to the corresponding reseller
– change the domain, set the numer of mail accounts to -1 (disable)
– change the traffic limit
-> ok
– if needed: change the domain, set the traffic limit back to the previus number

this way the domain is removed from the domain hashfile (the mportant thing is the change of the transfer volume).

Note by BT: The traffic limit trick is needed to invoke the ISPCP Engine, which updates the domains.

Udgivet i Knowledge Base, Linux, Old Base | Skriv en kommentar

OpenVZ recipies

#tcpsockets (must set both upper mem limit and numsockets)
VZID=199 SOCKET_MB=5 NUM_SOCKETS=360 \
SOCKET_BAR=$((1024**2*$SOCKET_MB)) \
SOCKET_LIM=$(($SOCKET_BAR+($NUM_SOCKETS*2560))) ; \
vzctl set $VZID \
–numtcpsock $NUM_SOCKETS \
–tcpsndbuf $SOCKET_BAR:$SOCKET_LIM \
–tcprcvbuf $SOCKET_BAR:$SOCKET_LIM \
–save

#othersockets, ie mysql etc. (must set both upper mem limit and numsockets)
VZID=199 SOCKET_MB=5 NUM_SOCKETS=360 \
SOCKET_BAR=$((1024**2*$SOCKET_MB)) \
SOCKET_LIM=$(($SOCKET_BAR+($NUM_SOCKETS*2560))) ; \
vzctl set $VZID \
–numothersock $NUM_SOCKETS \
–othersockbuf $SOCKET_BAR:$SOCKET_LIM \
–save

#kmemsize
VZID=199 KMEM_MB=30 \
MB=$((1024**2)) \
KMEM_LIM=$(($KMEM_MB*$MB)) \
KMEM_BAR=$(($KMEM_LIM-($KMEM_LIM/10))) ; \
vzctl set $VZID \
–kmemsize $KMEM_BAR:$KMEM_LIM \
–save

#privvmpages
VZID=199 MEM_MB=1024 KMEM_MB=20 \
PAGE_MB=$((1024**2/4096)) \
MB=$((1024**2)) \
KMEM_LIM=$(($KMEM_MB*$MB)) \
KMEM_BAR=$(($KMEM_LIM-($KMEM_LIM/10))) \
MEM_BAR=$((($MEM_MB-$KMEM_MB)*$PAGE_MB)) \
MEM_LIM=$(($MEM_BAR+($MEM_BAR/10))); \
vzctl set $VZID \
–privvmpages $MEM_BAR:$MEM_LIM \
–kmemsize $KMEM_BAR:$KMEM_LIM \
–save

#disk
VZID=199 DISKGB=8 \
GB=$((1024**2)) \
DISKSOFT=$(($DISKGB*$GB)) \
DISKHARD=$(($DISKSOFT+($DISKSOFT/10))); \
vzquota setlimit $VZID -b $DISKSOFT -B $DISKHARD

Udgivet i Knowledge Base, Linux, Old Base | Skriv en kommentar

Decrypt SQL and Mail password from ISPCP

#!/usr/bin/perl
#
# This is GPL!
#
# Writen by Mikkel Christensen, Mikjaer Aps
#

chdir(“/var/www/ispcp/engine”);
require ‘/var/www/ispcp/engine/ispcp_common_code.pl’;

my ($rs, $real_password);
my $pass = $ARGV[0];;

($rs,$real_password) = decrypt_db_password($pass);
printf (“%s”,$real_password);

exit(0);
~

Udgivet i Knowledge Base, Linux, Old Base | Skriv en kommentar

USB Serial OSX install

The new unit:
Has no label on the unit.
Vendor-id: 0x0403 (Future Technology Devices International Limited)
Product-id: 0x6001

Download the driver from: http://www.ftdichip.com/Drivers/VCP.htm

The old unit:
Is labeled Belkin on both sides of the unit.
Vendor-id: 0x050d (Belkin Corporation)
Product-id: 0x0109

Havent found the driver yet …

Udgivet i Knowledge Base, Old Base | Skriv en kommentar

SSL SMTP operation

% perl -MMIME::Base64 -e ‘print encode_base64(“\000base\@example.net\0001234abcd”)’
AGJhc2VAZXhhbXBsZS5uZXQAMTIzNGFiY2Q=

% telnet 1.2.3.4 25
220 smtp.example.net NO UCE ESMTP
ehlo testing
250-smtp.example.net NO UCE
250-STARTTLS
250-PIPELINING
250 8BITMIME
quit

% openssl s_client -starttls smtp -crlf -connect 1.2.3.4:25

220 a.mx.jms1.net NO UCE ESMTP
ehlo testing
250-a.mx.jms1.net NO UCE
250-AUTH LOGIN PLAIN
250-AUTH=LOGIN PLAIN
250-PIPELINING
250 8BITMIME

AUTH PLAIN AGptczFAam1zMS5uZXQAbm90Lm15LnJlYWwucGFzc3dvcmQ=
235 ok, go ahead (#2.0.0)

mail from: <base@example.net>
250 ok
rcpt to: <base@example.net>
250 ok
data
354 go ahead
From: John <base@example.net>
To: Nobody <base@example.net>
Subject: Test from Uni-Fix

Base rules!
.
250 ok 1113954693 qp 29052
quit
221 a.mx.jms1.net NO UCE

Udgivet i Knowledge Base, Linux, Networking, Old Base | Skriv en kommentar