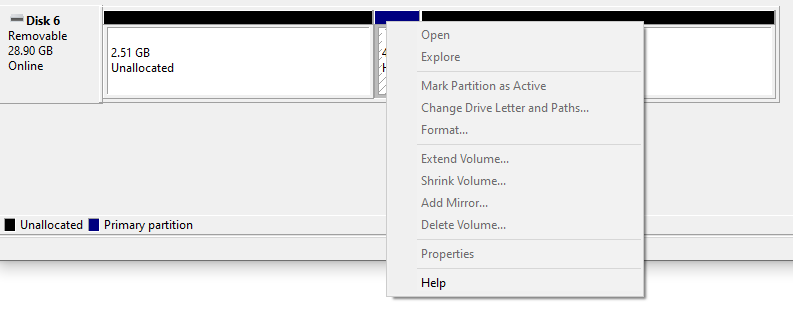
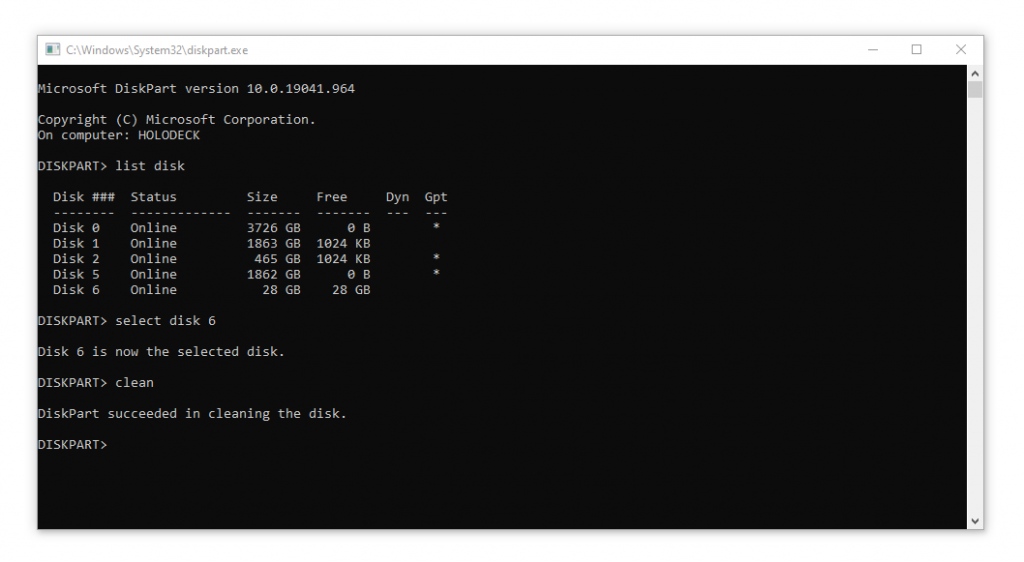
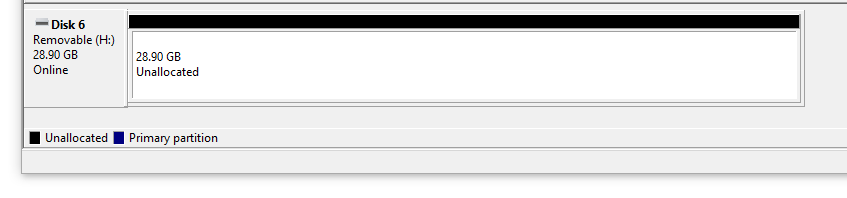
Auto-updating timestamp column i MariaDB/MySQL

If you need a colum that will automagically show when a row was created or changed you can use the following:

 CREATE TABLE `vars` (
  `id` int(11) NOT NULL AUTO_INCREMENT,
  `key` varchar(45) DEFAULT NULL,
  `value` longtext DEFAULT NULL,
  `timestamp` timestamp NOT NULL DEFAULT current_timestamp() ON UPDATE current_timestamp(),
  PRIMARY KEY (`id`),
  UNIQUE KEY `key_UNIQUE` (`key`)
); 

Now try to insert some data:

MariaDB [portal]> insert into vars (`key`,`value`) values ('foo','bar');
Query OK, 1 row affected (0.010 sec)

MariaDB [portal]> select * from vars;
+----+------+-------+---------------------+
| id | key  | value | timestamp           |
+----+------+-------+---------------------+
|  1 | foo  | bar   | 2021-08-09 10:43:30 |
+----+------+-------+---------------------+
1 row in set (0.001 sec)

MariaDB [portal]>

And then change those data:

MariaDB [portal]> update vars set value = "BAR" where id=1;
Query OK, 1 row affected (0.005 sec)
Rows matched: 1  Changed: 1  Warnings: 0

MariaDB [portal]> select * from vars;
+----+------+-------+---------------------+
| id | key  | value | timestamp           |
+----+------+-------+---------------------+
|  1 | foo  | BAR   | 2021-08-09 10:44:44 |
+----+------+-------+---------------------+
1 row in set (0.001 sec)

MariaDB [portal]>

Enjoy 😉

Udgivet i Uncategorized | Skriv en kommentar

Nagios / Incinga plugin for verifying ssl certificates

#!/usr/bin/php7.3
<?php

function usage()
{
        print "Usage: check_ssl_certificate <FQDN>[:port number] <Warning Threshold> <Critical Threshold>\n";
        die();
}

# Check for parameters

if (!isset($argv))
        usage();

if (count($argv) != 4)
        usage();

list ($null, $hostname, $warning, $critical) = $argv;

$portnumber = 443; // Default

# Did we get a port number?
if (preg_match("/(.+):([0-9]+)/", $hostname, $matches)) # We got a port number
        list ($null, $hostname, $portnumber) = $matches;

# Are the thressholds numeric?
if ((!is_numeric($warning)) or (!is_numeric($critical)))
        usage();

# Fetching certificate
$get = stream_context_create(array("ssl" => array("capture_peer_cert" => TRUE)));
if (!@$read = stream_socket_client("ssl://".$hostname.":".$portnumber, $errno, $errstr, 30, STREAM_CLIENT_CONNECT, $get))
{
        print "CRITICAL: Could not connect to $hostname($portnumber): $errstr.\n";
        die(2);
}


$cert = stream_context_get_params($read);
$validTo = openssl_x509_parse($cert['options']['ssl']['peer_certificate'])["validTo_time_t"];

#calculate difference
$diff = $validTo - time();
$days = floor( $diff / 60 / 60 / 24);

# Report back to nagios
if ($days < $critical)
{
        print "CRITICAL: $hostname expires in $days days.\n";
        die(2);
}
else if ($days < $warning)
{

        print "WARNING: $hostname expires in $days days.\n";
        die(1);
}
else
{
        print "OK: $hostname expires in $days days.\n";
        die(0);
}
Udgivet i Nagios, PHP, Uncategorized | Skriv en kommentar

Fixing broken ini_parser in PHP7

The cause if this problem is a broken brain somewhere in the PHP Developer comunity, for some reason they have removed support for using hash-marks (#) for comments in PHP 7.

Theres no valid reason for this, it’s not like that character has some other meaning now, it’s just removed. It’s also pretty arrogant to try and dictate changes like this, i do not decide what format the files i need to read are in, i just need to read them – and now i cannot do that with the built in functions and needs to use ugly hacks like this:

function real_ini_parser($file)
{
    return parse_ini_string(preg_replace('/^#.*?\n/m',
                          '',file_get_contents($file)),true);
}

Yet another reason to switch to a more modern programming language!

Udgivet i Uncategorized | Skriv en kommentar

OpenVPN på FreeNAS

FreeNAS kommer med OpenVPN som en del af basedist, men den skal sættes manuelt op, der er ikke gui til det (endnu?). Ved hver reboot overskrives /etc, derfor skal persistent config oprettes i /conf/base istedet.

Opret mappen /conf/base/etc/local/openvpn og placer din .ovpn fil der.

Ret herefter /conf/base/etc/rc.conf og tilføj:

openvpn_enable="YES"
openvpn_configfile="/usr/local/etc/openvpn/vpn-profile.ovpn"

Evt. kan du teste at alting virker med:

/usr/local/etc/rc.d/openvpn status

Nu burde VPN’en komme op automatisk ved genstart.

Udgivet i Uncategorized | Skriv en kommentar

Autostart browser on Raspberry Pi

First use this approach to create a python based browser, call it browser.py and leave it in pi’s home directory.

Set up .xinitrc to contain the following:

#!/bin/sh
xset s off
xset -dpms
xset s noblack
/home/pi/loop

The first three commands disable screen-blanking and the last one runs a script called loop, which looks like this:

#!/bin/bash
while :
do
	./browser.py
done

This makes sure that the browser automaticly restarts if it crashes, or if you kill the process manually, in order to reload the website. Finally take care of permissions:

chmod 755 .xinitrc browser.py loop

Then use raspi-config to make sure that the system logs in as “pi” without waiting for password, and you’re done.

Udgivet i Uncategorized | Skriv en kommentar

Croping video with FFMPEG

# ffmpeg -i test.mp4 -vf "crop=540:305:0:388" -t 5:00 out.mp4

Crops a rectangle with the dimensions 580×304 out of test.mp4 with an offset of 0 (left) and 388 (down) into out.php and skips everything after 5 minuttes, use this for testing your cut, when sattisfied, run command without “-t 5:00” to do entire video.

Udgivet i Uncategorized | Skriv en kommentar

Manual TLS Certificate Verification

$ openssl s_client -connect server.com:443 -crlf

imaps 443

pop3s 995

https 443

Udgivet i Uncategorized | Skriv en kommentar

Irssi channel-list

First install scriptassists (https://scripts.irssi.org/)

/run scriptassist

Now install adv_windowlist

/script install adv_windowlist

Setup adv_list, heres my config:

/toggle awl_viewer
/toggle awl_mouse
/set awl_block -19
/format awl_display_header 0

Enjoy 😉

Finish up by running

/save

And finaly move adv_windowlist from .irssi/script to .irssi/scripts/autorun to run at startup 🙂


Note (I was told that im doing it wrong):

15:09 <+vague> mikjaer, you mean you want to remove awl_display_header? /format -delete awl_display_header then /save

Udgivet i Irssi | Skriv en kommentar

Wireguard on debian

Start med og opdater debian

Enden laver man sudo eller køre det som root

apt update && apt upgrade -y
derefter add

# echo "deb http://deb.debian.org/debian/ unstable main" > /etc/apt/sources.list.d/unstable.list
# printf 'Package: *\nPin: release a=unstable\nPin-Priority: 90\n' > /etc/apt/preferences.d/limit-unstable
# apt update
# apt install wireguard

Når installation er færdig skal vi lave de første keys til serverne.

umask 077
wg genkey | tee privat.key | wg pubkey > public.key
ls
cat privat.key
Så har vi lavet en public og en privat key. De 2 keys skal vi bruge i vores opsætning.

Derefter skal vi i /etc/wireguard/ og lave vores interface navn. Den kan hed hvad vil gerne vil have, men kalde den wg0 for test.

eth0 skal være det interfaces på ens linux man gerne vil bruge.

Alt med ip6 kan fjernes vis man ikke vil bruge det.

touch /etc/wireguard/wg0.conf
vi /etc/wireguard/wg0.conf

[Interface]
PrivateKey = <indsæt privat.key sting her>
Address = 10.0.0.1/24
ListenPort = 51820
PostUp = iptables -A FORWARD -i wg0 -j ACCEPT; iptables -t nat -A POSTROUTING -o eth0 -j MASQUERADE; ip6tables -A FORWARD -i wg0 -j ACCEPT; ip6tables -t nat -A POSTROUTING -o eth0 -j MASQUERADE
PostDown = iptables -D FORWARD -i wg0 -j ACCEPT; iptables -t nat -D POSTROUTING -o eth0 -j MASQUERADE; ip6tables -D FORWARD -i wg0 -j ACCEPT; ip6tables -t nat -D POSTROUTING -o eth0 -j MASQUERADE
SaveConfig = true

[Peer]
PublicKey = den Publickey fra ens client
AlloedIPs = 10.0.0.2/32 # den ip client skal have, der er også en anden måde man kan add clienter på, det kommer senere
Nu skal vi tillade linux til og ip forward

vi /etc/sysctl.conf

Find dem og fjerne #

net.ipv4.ip_forward = 1
net.ipv6.conf.all.forwarding = 1
sysctl -p
Derefter skulle den gerne vis de er sat til ellers genstart for og være sikker.

Her vis hvordan man add en peer igennem console på serverne

wg set wg0 peer <public key af ens client> allowed-ips 10.0.0.2

Vis man vil noget i den retning så husk og lave en cron job som køre ved start op ellers skal man gør det i hånden ved hver start up

På ubuntu/debian vis man vil have firewall kan man installer ufw-

apt install ufw
ufw allow 51820/udp
ufw allow 22/tcp
ufw enable
ufw status verbose
Derefter kan vi starte interface op

wg-quick up wg0
systemctl enable wg-quick@wg0

wg show

ip addr

Så skulle serverne være sat op

På client siden gør man det samme i forhold til den linux man er på

vi /etc/wireguard/client.conf

[Interface]
PrivateKey = <Output of privatekey file that contains your private key>
Address = 10.0.0.2/24

[Peer]
PublicKey = <serverne public.key>
Endpoint = <ipaddressen til serveren>:51820
AllowedIPs = 0.0.0.0/0
0.0.0.0/0 er for og route alt trafik igennem vpnen.
Derefter køre man

wg-quick up client

wg show
så skulle det gerne virke, det er meget vigtig man åbne porten op på firewall og nat det ud.

PersistentKeepalive = 25 er vigtig i client.conf vis man roamer meget med ens computer eller tlf.

Udgivet i Knowledge Base, Networking | Tagget | Skriv en kommentar

Benchmarking disk-access

root@defiant:~# sync
root@defiant:~# echo 3 > /proc/sys/vm/drop_caches

mmc@defiant:~$ dd if=test.iso | pv > /dev/null


Udgivet i Uncategorized | Skriv en kommentar